
Audience
This article is for customers who have purchased products based upon the Raspberry Pi microprocessor, and who need to connect those products to a wireless (WiFi) network. Same Day Rules has developed software that uses Bluetooth to configure the wireless interface of the Raspberry Pi so that it can automatically connect to your home WiFi network. Products marked as Bluetooth Configurable are delivered with this software pre-installed by Same Day Rules.
How it Works
Software installed by Same Day Rules on Bluetooth Configurable products communicates with compatible software that you install on your home computer. Your home computer uses its Bluetooth interface to configure the WiFi interface of the Raspberry Pi. You enter information about your WiFi network and the software running on your home computer sends that information using Bluetooth to the Raspberry Pi, which it then uses to connect to your home network.
The overall process involves:
- Downloading and installing the Windows client software on your home computer (laptop, desktop, tablet).
- Powering on the Raspberry Pi.
- Launching the Windows software and following the on-screen instructions.
- If your WiFi router is configured to allow only known computers to connect to your network (namely those on its WiFi access list), then you’ll need to add the Raspberry Pi to your router’s access list.
Installing the Windows Software
You will need a computer that is running the Windows 10 (or higher) operating system, and that has a Bluetooth Low Energy (BLE) interface, which includes most modern computers.
To install the software:
- Navigate to the Microsoft Store and search for Connect My Pi To WiFi.
- Download the software.
- Launch the installer and follow the on-screen instructions.
Running the Windows Software
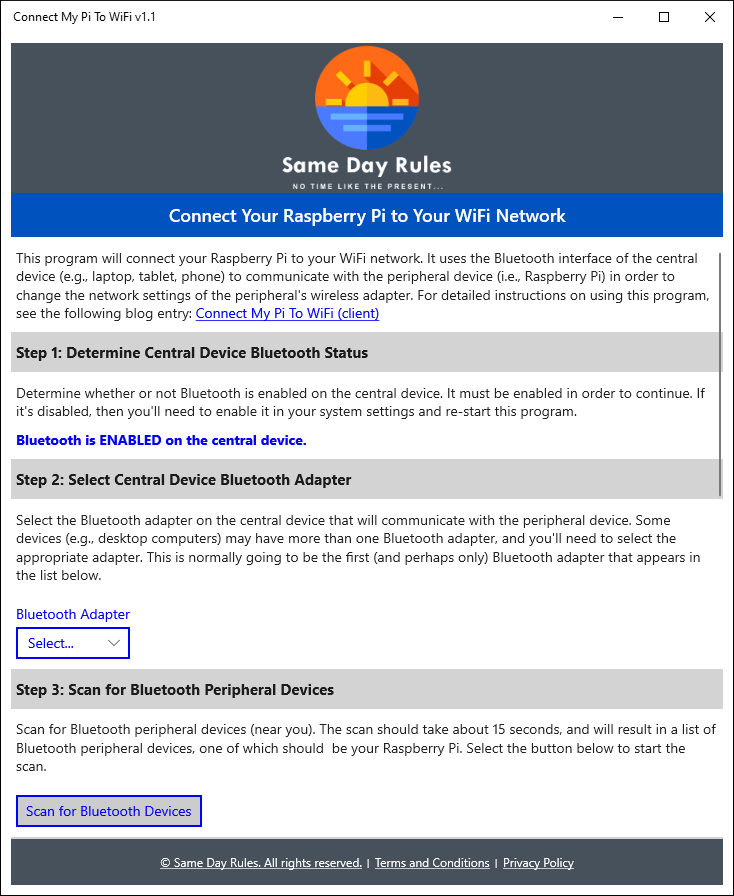
Bluetooth devices: Within the software, references are made to the terms central and peripheral devices. The Raspberry Pi is the peripheral device and your home computer is the central device. This is standard Bluetooth terminology.
How to identify your Pi: The software running on the Raspberry Pi assigns a common name to the Bluetooth interface so that you can easily identify it. This is the name that will appear when you are scanning for peripheral devices near you in the steps below. That name should be clearly annotated within the product documentation. Raspberry Pi Bluetooth peripheral names typically are prefixed with rpi or RPi and then have a product-specific suffix, for example, rpi-vctrl or RPi Valve Controller.
Before you run the software:
- Move the Raspberry Pi within ~6 feet of your home computer (just to make it easier to connect over Bluetooth).
- Power on the Raspberry Pi and wait ~1 minute for it to finish starting up.
Launch the Windows software (Connect My Pi To WiFi):
- The software will tell you whether or not your home computer has Bluetooth enabled. If it is disabled, you will need to go into the Windows settings and enable Bluetooth.
- Many desktop and some laptop computers have more than one Bluetooth interface. It may not matter which interface you use, but you will need to select one from the drop-down list of identified adapters. If there are no adapters displayed in the list, then your computer has a hardware or software configuration issue and you’ll have to address that issue before you can continue.
- Select the Scan for Bluetooth Devices button to start the process of searching for peripheral devices within range of the Bluetooth adapter. It is possible that the Raspberry Pi will not appear in the first scan, and you may have repeat the scan. Remember that your Raspberry Pi product must be marked as Bluetooth Configurable for it to respond to the scan request.
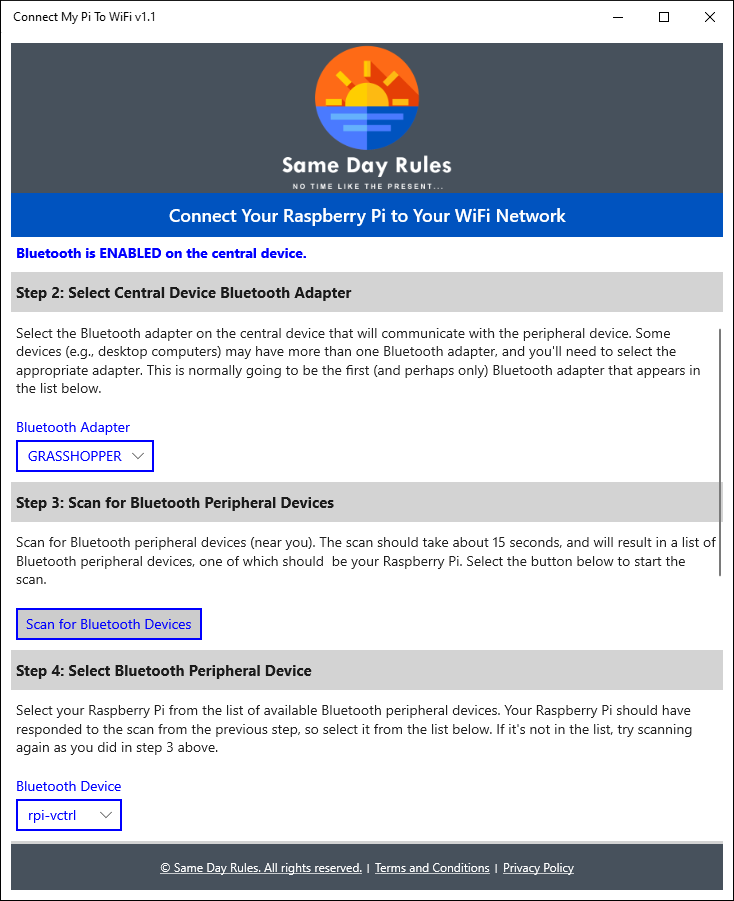
- Open the list of devices that were found during the scan and select the name that corresponds to the Raspberry Pi (the name will match that given to you in the product documentation). If the device is not in the list, repeat the scan.
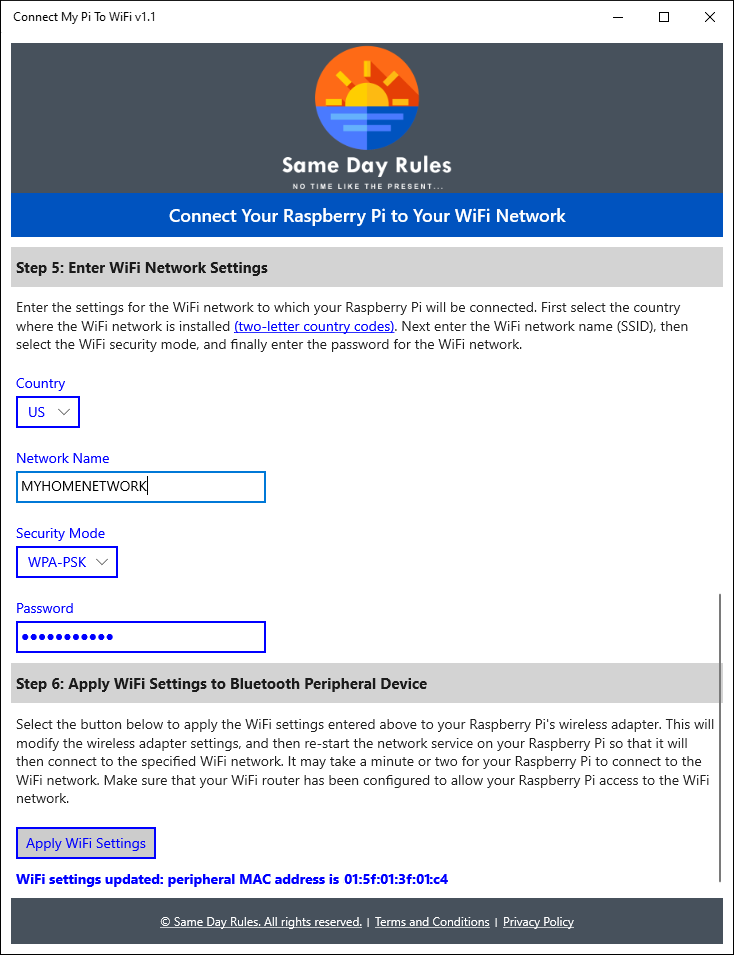
- Now that you have found the Raspberry Pi Bluetooth peripheral device, enter the information identifying your home WiFi network. First select your two-letter country code (codes can be found here). Then enter the name of the WiFi network (also called the network SSID). Then select the security mode used by the WiFi network. And finally, enter the password for the WiFi network (also called the passcode or passphrase).
- Select the Apply WiFi Settings button to transfer the WiFi settings over Bluetooth from your home computer to the Raspberry Pi. The software running on the Raspberry Pi will save the settings and then restart the WiFi interface on the Raspberry Pi, which should then connect to your home WiFi network. If the operation is successful, you will see the MAC address of the Raspberry Pi WiFi interface displayed – you may need the address for your home WiFi network router if your router filters addresses for security reasons.
All Done
That’s it! Your Raspberry Pi product should now be connected to your home WiFi network. If you need to change the WiFi network settings on the Raspberry Pi in the future, just repeat the steps above (the software responsible for configuring the wireless interface over Bluetooth will continue to operate).